


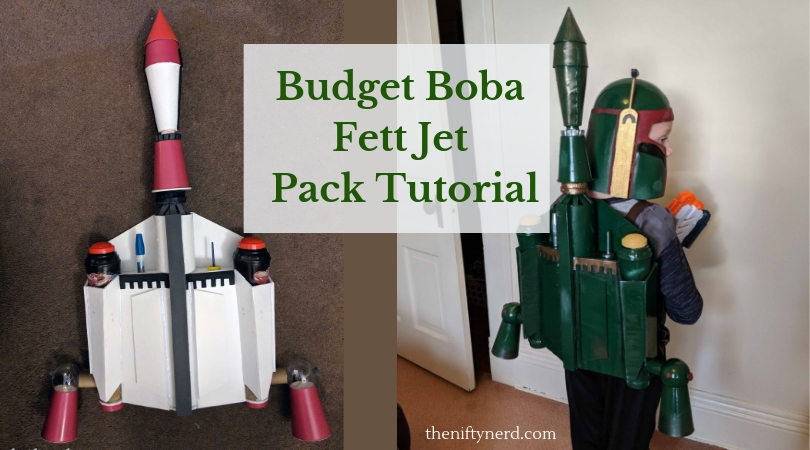
Budget Boba Fett Jet Pack Tutorial
Learn how to make Boba Fett’s jet pack from Star Wars with this craft tutorial. When my stepson asked to be Fett for Halloween I knew we couldn’t settle for a store bought costume this year. Budget challenge accepted!
Supplies
- 1 square of EVA foam (bulk or budget)
- 1-2 sheets of foam core board
- 1 sheet of poster board
- thin sheet of foam (bulk or budget)
- Styrofoam cone
- 2 sippy cups
- 2.5″ diameter small poster tube (2 tubes at least 12″ long or 1 tube at least 24″ long)
- 3″ diameter large poster tube (at least 15″ long)
- cardboard tube from tin foil roll
- stack of cardboard paper drinking cups
- 2 plastic Christmas bulbs
- Krazy glue tube (optional)
- old paint brush and round eraser (optional)
- can of plasti dip
- silver spray paint
- green spay paint
- additional acrylic paints (yellow, metallic copper/bronze, black, red)
- nylon straps with D-rings
- 1″ diameter PVC pipe
Of these items, I had the following already at home: dried-up tube of Krazy glue, old paint brush, kids eraser, EVA foam, thin foam sheet, acrylic paint, poster tubes, PVC pipe, and a tin foil tube. (it’s projects like this that cause me to be a pack rack! You never know when you’ll need to repurpose an item 🙂 )
These items I purchased from the hardware store: plasti dip
These items I purchased from the craft store using 40% off coupons: nylon straps, D-rings, spray paint.
The rest of the supplies I purchased from the dollar store for $1 each.
If you had to purchase everything off this list, I would estimate a total cost of no more than $50 (be sure to use those 40% off coupons at Hobby Lobby and Michael’s!)
Tools
- hot glue gun (with extra glue sticks)
- cutting board or mat
- scissors and/or utility cutting knife
- metal ruler
- popsicle sticks
- ball point pen or marker
- hacksaw
- hot knife
If you’re at all interested in making costumes or crafting, then all of these tools are must have items to own in order to work on materials with.


Directions
1. Prep your sippy cups for use by using the hot knife to trim off the handles and cut off the bottom of the drinking glasses. You’ll want to cut them so they’re just wide enough to slip over your 2.5″ poser tubes. Since the diameter of the cups varies, I (and really I mean my husband 😉 )started low and used trial and error to reach the correct width. Remember, melted plastic gives of fumes, so please be sure to work in a well ventilated space.
2. Cut out the back piece of your jet pack from foam core board using a utility knife. My back piece was 14″ wide, with the top narrow width being 3″. The side height was 12″ while the middle height was 15″. You’ll end up with a house-like shape, but with a flat roof instead of a pointed roof.
When cutting thicker materials like foam core board or thicker EVA foam, always make your cuts in 2-3 passes. The first pass is to score the material to make a guiding line. The 2nd (and sometimes 3rd) pass is to fully cut through the material. Always use a sharp blade. A dull blade can catch and tear your material, plus it’s more dangerous to cut with.
3. Cut your 3″ poster tube so it’s 15″ tall. Cut your 2.5″ poster tube into 2 pieces that are each 12″ tall.
The 3″ diameter tube will be the center rocket. The 2-2.5″ poster tubes will be the side fuel cylinder chambers.

4. The blasters will be constructed from paper cups, plastic ornaments, and the cardboard tin foil tube. Cut off the rounded lip of 2 paper cups and cut out their bottoms.

5. Use hot glue to glue the ornament bulb to the bottom of the cup. Be sure to angle the top of the ornament bulb to the side. You’ll then glue a 2″ segment of the tin foil tube over the ornament bulb top.
If you need to further secure any pieces, beyond the hold power of the hot glue, use E6000 glue (which does take time to dry).

6. Glue your blasters to the sides of your 2.5″ poster tube fuel chambers.
7. Secure the cups to the top of the fuel chamber tubes.

8. Hot glue your fuel chamber tubes and rocket tube to the back piece of your jet pack. I glued little scrap wedges of EVA foam to the sides of the tubes to further secure them.

9. Next we want to start closing up our jet pack. We’ll do that first by creating the bottom edge panel. Stand your jet pack upright and use it as a tracing template on foam core board. Feel free to draw in a vent for added detail.

You’ll also create 2 top pieces for the top of the jet pack. They’ll be similar in shape to the bottom piece, except there will be a left and right side (since you’ll be creating 2 sections to go around the center rocket and side fuel chambers. (see the photo below with the Krazy glue tube)
*If you’re smart, you’ll cut strap holes for your jet pack at step 9, before completely closing it in. I forgot and had to blindly cut at the end of my project 🙂

10. Glue these pieces in place and create 2 flat panels of foam core board to lay on top, between the rocket and fuel chambers to fully seal the jet pack.
If want to create test templates before using your foam core board, use poster board or scrap paper to mock-up the size and shapes of the piece you’ll need first.

11. Run a line of hot glue along any seams and (while it’s still hot) run the smooth edge of a popsicle stick down the line to create a smooth seam.

12. Now we want to close in the 2 fuel chambers using 3 panels of foam core board. I took a couple tries with paper templates to get the sizes and shapes of these pieces correct. Don’t be afraid of playing around -progress, not perfection 😉

13. Add additional foam details to the back of the jet pack. I used a strip of EVA foam straight up the back and cut toothed strips of thin foam to go along the top border. For one final detail, I cut out 2 additional panels of foam core board and glued them on either side of the rocket tube.

14. Create the details on the top of the jet pack -I think these are supposed to be antenna or something. I had an old dried-up tube of Krazy glue that I thought had a fun shape. For the 2nd one I stuck an old paintbrush through a smiley face eraser. I used a utility knife to cut a whole to slip the paint brush handle through.
I carefully use my hot knife to cut holes into the foam core board and used hot glue to secure both “antenna” into their slots.

15. Our next step is to start constructing the rocket. The pieces of our rocket will be secured to the PVC pipe. To keep the pipe in place within the rocket tube, cut 2 disks of EVA foam to secure it. One disk will slide down into the tube. The second disk will slide to the top lip of the tube to create a lid.
I did not glue these spacers and the PVC pipe into the rocket tube until I had created all the pieces of the rocket and had tested them all out together first.

16. The very top of your rocket will be comprised of a Styrofoam cone, a paper cup, and a poster board cone. Trim the bottom of your cup off to leave the top half. Create your cone point cone by cutting out a pac-man shaped piece of poster board and wrapping the edges over themselves (close pac-man’s mouth). I used my hot knife of trim the Styrofoam cone shorter and to “drill” into the bottom to create a cylinder slot to fit the PVC pipe into.

17. Create a middle spacer on the rocket by trimming the top lip off and the bottom out of a paper cup. Create 2 EVA foam spacers that fit the width of the top and bottoms of the cup. The PVC pipe will slide through these.

18. To create another spacer on the rocket, cut a strip of EVA foam that’s long enough to wrap around the PVC pipe. Score lines down the strip (cut through the foam 1/3-1/2 of the way through), When you wrap the foam around the PVC pipe, this will open up the scores to add further detail.

Here are the rocket pieces laid out: The PVC pipe with top spacer that’s glued at the top of the rocket tube. The cup with the top and bottom EVA spacers. Between the PVC pipe and the cup’s spacers there is a handful of small EVA foam blocks. These are glued standing up to the top of the rocket tube and the PVC pipe. Since the pipe is narrower than the tube, the foam strips lean inward -creating a vent-like look. Next is the strip of EVA foam that was scored, followed by the Styrofoam cone and attached cup. Next to these items are 3 narrow strips of the thin EVA that are glued to the sides of the Styrofoam and cup cones -almost like flat wings/ridges. Last is the top poster board cone.
19. Start by gluing the PVC pipe and spacers into the rocket with hot glue. Then work your way up the PVC pipe to secure each piece in order.

And there you have your jet pack, complete and ready to be prepped for painting.
*I did end up adding the bases of 2 paper cups to the bottom of the pack (as the bottom of the fuel chambers) to add a little more depth and detail to the pack.

20. First you need to seal your project before spray panting. Foam is a porous substance and will soak up paint unless it’s sealed. You can seal everything by painting it using a foam brush and watered-down wood glue (2-3 coats) or your can use Plasti Dip (my preferred method). If you’re using Plasti Dip you MUST seal your Styrofoam using watered-down glue first. Sytrofoam melts from aerosol items. Also, don’t use E6000 glue on Styrofoam; that will eat it too.

21. Once the Plasti Dip has dried, spray paint the jet pack silver. This will be a middle layer that we’ll use to weather the pack later.
22. Spray the jet pack green. My jet pack turned out army man green, but my step son picked the shade so I let it ride 🙂

23. Add your straps (if you forgot to do this earlier like me). I used my hot knife to cut slits in the back of the jet pack, then used a wire hanger to help feed the nylon straps through the wholes. I used D-rings to make the straps adjustable.

24. The final step is to weather the jet pack. Gently use course sand paper to rub away spots of the green paint to reveal the silver underneath. Use your acrylic paints to add other color details, especially on the rocket and the tops of the fuel chambers. Although you can’t really see it in the photo, I also dry brushed (put paint on your brush then remove most of it on a scrap surface before painting) black paint into crevices to create age and dirt build up.

Don the rest of your outfit and get to bounty hunting!


All total (not including paint dry time), this build took me about 2 days to complete. My stepson loved his Halloween costume (which included a helmet and chest armor as the photos show). We’re already planning how to add on to the costume for next year.
Do you have any questions about the build process? Please let me know in the comments below and I”ll do my best to guide you!
